Search

用 tar 的 -(stdin/stdout)配合 | 管道,把目录内容从一端流式送到另一端,全程不落临时文件。比逐文件拷贝更快、更稳,还保留目录结构与权限。

基本形态

# 左侧:tar 打包写到 stdout;右侧:从 stdin 解包到目标目录
tar cf - -C /src dir \
  | tar xf - -C /dst
  • c 创建归档、f - 输出到 -(stdout);x 解包、f --(stdin)读取归档
  • -C dir 先切换目录再操作,避免把绝对/相对路径的前缀带进归档

跨主机/跨进程传送

管道两侧不必是同一进程,常见于 kubectl exec、ssh、curl 等场景:

# 从远端 Pod 拉目录到本地,剥离前两级路径
kubectl exec -n platform "$POD" -- tar cf - /app/config \
  | tar xf - --strip-components=2 -C /home/laborant/config

# 等价写法:左侧把 /app 设为根,归档内只剩 config/ 一级前缀,右侧只需 strip 1
kubectl exec -n platform "$POD" -- tar cf - -C /app config \
  | tar xf - --strip-components=1 -C /home/laborant/config
  • --strip-components=N:去掉每个成员路径最前面的 N 个分量(本例去掉 app/config 两级)
  • exec 不加 -t(TTY),避免换行转换污染二进制流
  • -C 目标目录须先存在,否则报 Cannot open,先 mkdir -p

变体

  • 压缩(网络慢):左侧 tar czf -,右侧 tar xzf -(gzip)
  • 本地备份tar cf - dir | tar xf - 等价 cp -a,但保留更完整属性

注意

  • 两端都需安装 tar(busybox/distroless 容器可能没有)
  • --strip-components 由 GNU tar / bsdtar 提供,macOS / Linux 均有
  • 非 root 解包时文件 owner 变成当前用户(root 下才默认保留)

当 Kubernetes 将 ConfigMap 挂载为 volume 时,pod 内的文件其实是 symlink,直接 kubectl cp 会跳过所有文件导致拷不出内容。用 kubectl exec + tar 管道即可复制真实文件。

问题

# 这样拷贝会失败:目录内全是 symlink,无 .conf 文件落地
kubectl cp platform/${POD}:/app/config/ /home/laborant/config/

warning: skipping symlink: "/home/laborant/config/server.conf" -> "..data/server.conf"
# ...
# kubectl cp 退出码为 0 却什么都没拷出来

原因:kubectl cp 内部用 tar 流式传输,但没传 --dereference。挂载路径下的条目全是 symlink,tar 视其为符号链接而跳过。kubectl cp 即使失败也返回 0,必须 ls 验证结果。

解决方案

在 pod 内部 tar 打包(内核 VFS 透明解析 symlink),再管道给本地 tar 解包:

# 左侧在 pod 内打包并写 stdout,右侧本地解包并剥离前两级路径
kubectl exec -n platform "$POD" -- tar cf - /app/config \
  | tar xf - --strip-components=2 -C /home/laborant/config
  • --strip-components=2:去掉 app/config 两级前缀,只留裸文件名
  • tar xf -:从 stdin 读取归档,-C 指定解包目录
ls /home/laborant/config/
# database.conf  feature-flags.conf  logging.conf  server.conf

通用注意点与变体

  • exec 不要加 -t(TTY):TTY 会对输出做换行转换,污染二进制归档流;无 TTY 的 exec 才是干净的 stdin/stdout 回传
  • -C 目标目录必须先存在tar 不会自动创建目录,会报 Cannot open 之类错误,先 mkdir -p /home/laborant/config
  • 等价写法:左侧 tar cf - -C /app config 时归档成员只有 config/... 一级前缀,右侧只需 --strip-components=1;与”绝对路径 + strip 2”语义等价,任选一种保持一致
  • 压缩变体:网络较慢时左侧 tar czf -(gzip 压缩),右侧 tar xzf - 解压
  • 依赖:Pod 内需装有 tar(busybox/distroless 镜像可能没有,报 exec: tar: not found);本地的 --strip-components 由 GNU tar / bsdtar 提供,macOS / Linux 均有
  • 权限:非 root 解包时文件 owner 会变成当前用户(tar 仅在 root 下默认保留 owner),通常无碍

获取运行中的 pod 名

POD=$(kubectl get pod -n platform \
  -l app=config-service \
  -o jsonpath='{.items[0].metadata.name}')
原子更新机制:两层级联导致 kubectl cp 失效

ConfigMap 以 volume 挂载时,目录结构是两层间接:

/app/config/
├── ..2026_08_19_10_19_29.2041564214/   ← 真实目录,存真实字节
├── ..data -> ..2026_08_19_10_19_29.2041564214   ← 指向真实目录
└── server.conf -> ..data/server.conf    ← 每个文件都是 symlink
  • 权限串首字符 l 表示 symlink(lrwxrwxrwx
  • kubelet 更新 ConfigMap 时写入新时间戳目录,再通过一次原子 rename() 重指 ..data,保证运行中的 pod 立即看到新内容且不出现新旧混合
  • tar 默认不跟随 symlink,kubectl cp 因此全部跳过

kubectl create ingress--rule 语法里,tls 是挂在某条 rule 上的,它的 host 会直接复用该 rule 的 host,命令行层面没有单独指定 tls hosts 的选项

kubectl create ingress snake-ingress -o snake \
  --rule="a.com/=snake:80,tls=snake" \
  --dry-run=client -o yaml

生成结果一定是:

spec:
  rules:
  - host: a.com
    http:
      paths:
      - path: /
        pathType: Exact
        backend:
          service:
            name: snake
            port:
              number: 80
  tls:
  - hosts:
    - a.com
    secretName: snake

rules[].hosttls[].hosts 必然一致,无法让两者不同。

可行的两种办法

  1. 手动改生成的 YAML(最直接):用 --dry-run=client -o yaml 生成后直接编辑 spec.tls[0].hosts,改成你想要的域名(如通配符证书 *.a.com 或额外域名),与 rules[].host 脱钩即可。

  2. 用多条 --rule 聚合多个 host

    kubectl create ingress snake-ingress -o snake \
      --rule="a.com/=snake:80,tls=snake" \
      --rule="b.com/=snake:80,tls=snake" \
      --dry-run=client -o yaml

    这样 tls[0].hosts 会变成 [a.com, b.com],但本质上只是各 rule host 的并集——并不能做到”某条 rule 的 host 不出现在 tls.hosts 里”这种脱钩效果。

如果你的目标是”http 规则匹配 a.com,但证书 SAN 是别的域名(如通配符证书)“,最干净的做法就是方案 1:生成模板后手工改 tls.hostsapply

pi 的 fetch_content / web_searchBlocked internal address ... 198.18.0.0/15:TUN/fake-IP 代理(Surge、Clash、Mihomo)把公网域名解析到保留段,被 SSRF 防护误拦。

~/.pi/web-search.jsonssrf.allowRanges 豁免该网段:

{
  "ssrf": { "allowRanges": ["198.18.0.0/15"] }
}

注意路径是 ~/.pi/web-search.json不是 ~/.pi/agent/。查找顺序:$PI_CODING_AGENT_DIR$XDG_CONFIG_HOME/pi~/.pi

该文件同时是 credential store(放 provider、API key),追加字段时保留现有内容。

免费版私有仓库不支持 GitHub 原生 auto-merge(API 对 allow_auto_merge=true 返回 200 但静默不生效,和 branch protection 一样提示 “Upgrade to GitHub Pro”)。此时 Renovate 托管版 App 默认的 platformAutomerge: true 会失效:PR 上写着 “Automerge: Enabled” 却永远不会合并。

解法:让 Renovate 自己合并 PR,并去掉周期限制(依赖 group:allNonMajor 已把所有 minor/patch 合并成一个 PR,提高频率不会增加噪音):

{
  "$schema": "https://docs.renovatebot.com/renovate-schema.json",
  "extends": [
    "config:recommended",
    "group:allNonMajor"
  ],
  "rangeStrategy": "bump",
  "dependencyDashboard": false,
  "labels": ["dependencies", "renovate"],
  "automerge": true,
  // 免费版私有仓库用不了 GitHub 原生 auto-merge,由 Renovate 自己合并
  "platformAutomerge": false,
  "packageRules": [
    {
      matchDepTypes: ["peerDependencies"],
      enabled: false,
    },
  ],
  "ignoreDeps": ["node"],
}

排查要点:PR API 返回 autoMergeRequest: null 且 CI 全绿、无 branch protection,却仍不合并,基本就是这个原因。

在 GitHub 页面一键打开对应仓库的 DeepWiki 文档,以及通过 url scheme 唤起本地 Logseq、VSCode 等应用,减少手动拼 URL 的操作。

插件地址:https://chromewebstore.google.com/detail/open-with-for-github/iaicdcencbmacjlfdbgaggfmikfpicig?authuser=0&hl=en

原理

利用 GitHub 仓库页当前的 owner/repo 拼出目标地址,并用 chrome.tabs 或 URL scheme 打开。

实际配置(ghq 管理,本地路径 ~/ghq/github.com/{owner}/{repo}

  • DeepWiki:https://deepwiki.com/{owner}/{repo}
  • Logseq:logseq://graph/MyLifeRecorded?page=github.com/{owner}/{repo}
  • Zed:zed://file/Users/zhaochunqi/ghq/github.com/{owner}/{repo}
  • VSCode:vscode://file/Users/zhaochunqi/ghq/github.com/{owner}/{repo}

示例代码

在 content script 中读取仓库路径,把 github.com/a/b 转为 {owner}/{repo}

// location.href 形如 https://github.com/tauri-apps/tauri
const match = location.href.match(/github\.com\/([^/]+)\/([^/]+)/);
const owner = match[1];
const repo = match[2];

// 打开 DeepWiki
chrome.tabs.create({ url: `https://deepwiki.com/${owner}/${repo}` });

// 打开本地应用(ghq 路径,注意需要 encode 路径中的空格等字符)
location.href =
  `vscode://file/Users/zhaochunqi/ghq/github.com/${owner}/${repo}`;

注意

  • 本地 url scheme 需要系统已注册对应 handler(VSCode 默认注册 vscode://,Zed 注册 zed://),否则会被浏览器忽略。

linux.do 为注册用户提供免费的 DeepLx API 密钥,可以直接填入陪读蛙翻译插件,实现免费高质量的网页翻译。

获取密钥

  1. 注册并登录 linux.do
  2. 访问 https://connect.linux.do/dash/deeplx 复制 DeepLx Api Key

配置陪读蛙

  1. 安装陪读蛙扩展
  2. 点击陪读蛙扩展图标进入选项页面,导航到「API 提供商」
  3. 选择 DeepLX(默认 Base URL 即为 linux.do 的 api.deeplx.org,无需修改)
  4. 在 API Key 处填入从 linux.do 复制的密钥
  5. 回到页面,在功能提供商里选择翻译服务为 DeepLX
  • 填好后点击「测试连接」,成功即完成配置
  • 遵守合理使用规范,避免高频无效请求

一直以为在阿里云买的域名必须完成 ICP 备案才能正常使用,所以有个域名闲置了很久。最近因为需要苹果开发者认证购买了一个域名,发现将 DNS 解析托管到 Cloudflare 即可正常使用,无需备案。

关键认知:备案是针对”在国内使用国内服务器提供服务”的要求。如果业务不面向国内用户、不接入境内服务器,域名本身可以自由使用,不备案也没问题。

操作方式

  1. 在阿里云域名控制台将 DNS 服务器改为 Cloudflare 分配的 NS 地址
  2. 在 Cloudflare 添加域名并配置 DNS 记录
  3. Cloudflare 的代理(橙色云朵)功能也可正常使用

域名解析走 Cloudflare,源站用海外服务器,完全绕开备案流程。

在 iOS Safari 中,顶部“下载/打开 App”大概率来自 Smart App Banner,而“点链接直接跳转 App”通常是 Universal Links

<meta name="apple-itunes-app" content="app-id=544007664">

YouTube 能显示“下载 YouTube”是因为网页声明了与 App Store App 绑定的 apple-itunes-app

如果带上 app-argument,用户点击“打开”可跳转到指定内容页:

<meta
  name="apple-itunes-app"
  content="app-id=544007664, app-argument=https://www.youtube.com/watch?v=dQw4w9WgXcQ"
>

如果 App 未上架 App Store,这一步无法生效,因为 app-id 无法对应有效应用。

Universal Links(网页链接直接唤起 App)

你要额外配置苹果的关联域:网站提供 apple-app-site-association,App 开启 Associated Domains

https://www.youtube.com/.well-known/apple-app-site-association
{
  "applinks": {
    "details": [
      {
        "appIDs": ["TEAMID.com.google.ios.youtube"],
        "components": [
          {
            "/": "/*"
          }
        ]
      }
    ]
  }
}

快速判断

  • Safari 顶部提示“下载/打开 App” → Smart App Banner
  • 点击 YouTube 链接直接切到 App → Universal Links
  • 想让“打开”跳具体内容页:app-argument + App 内处理深链

在 GHCR 里看到很多 untagged,不一定代表清理任务漏删了垃圾镜像。

如果一个 Docker 镜像是 multi-arch 构建,比如同时构建:

platforms: linux/amd64,linux/arm64

那么一个 tag 通常不是直接贴在某个具体平台镜像上,而是贴在一个“目录”上。这个目录的正式名字叫 OCI image index 或 manifest list。

可以把它理解成:

ghcr.io/org/app:sha-xxxxxxx
  -> 一个总入口 / 目录
      -> amd64 机器用的镜像
      -> arm64 机器用的镜像

用户拉镜像时还是用同一个 tag:

docker pull ghcr.io/org/app:sha-xxxxxxx

Docker 会根据本机架构自动挑正确的子镜像。amd64 机器拿 amd64,arm64 机器拿 arm64。

为什么会显示成 1 tagged + 4 untagged

以一个同时构建 linux/amd64linux/arm64,并且没有关掉 buildx 默认 provenance 的镜像为例,一次构建大致会产生:

1 个 tagged image index
2 个 untagged platform image manifest
2 个 untagged provenance attestation manifest

所以 GHCR 页面上看起来就是:

1 tagged + 4 untagged

这里的 2 个 platform manifest 是真正给不同 CPU 架构运行用的镜像。它们没有自己的 tag,因为 tag 贴在上层 image index 上。

另外 2 个 provenance attestation manifest 不是运行镜像,而是构建证明。它们记录“这个镜像是从哪个 repo、哪个 commit、哪个 Dockerfile、哪次 GitHub Actions run 构建出来的,以及用了哪些基础镜像/构建依赖”。常见格式是 in-toto statement,predicate 是 SLSA provenance。

这些 untagged 可以删吗

不要只看 GHCR UI 上写着 untagged 就手动删。

如果这些 untagged 是被某个保留 tag 引用的子 manifest,删掉以后可能会破坏 multi-arch 镜像,或者丢掉 provenance 证明。正确的清理逻辑应该理解 image index 和它下面的子 manifest,而不是把所有 UI 上的 untagged 都当成孤立垃圾。

dataaxiom/ghcr-cleanup-action 这类专门处理 GHCR 清理的工具,会把 multi-arch image、attestation、referrer 这些关系一起考虑。删除旧 tagged image 时,它会连同下面的子 manifest 一起处理;保留新 tagged image 时,被引用的 untagged 子 manifest 也应该留下。

GitHub 能避免这种显示吗

GHCR 目前没有一个开关可以说“不要把被 image index 引用的子 manifest 显示为 untagged”。它是按 registry 里的 manifest/version 展示,所以 UI 会显得比较吵。

能减少数量,但都有代价:

  • 关掉 provenance:每批少两个 attestation,代价是没有构建来源证明。
  • 只构建单平台:少一个平台镜像,代价是不再同时支持 amd64/arm64。
  • 单平台并关掉 provenance:最干净,但功能和供应链信息都缩水。

更实用的判断是:不要追求 GHCR 页面上完全没有 untagged,而是区分“孤立 untagged”和“被保留 tag 引用的 untagged 子 manifest”。前者可以清理,后者是镜像结构的一部分。

市售的食用鸡蛋几乎都是未受精的,无法孵化出小鸡。

原理

  • 食用鸡蛋: 养殖场只养母鸡或严格隔离公鸡,母鸡无需交配就能正常产蛋,这些蛋只是卵细胞,没有胚胎
  • 受精蛋: 需要母鸡和公鸡交配后产下,在 37.5°C 和适当湿度下孵化约 21 天才能出壳

如何区分

  • 照蛋: 用强光照射,受精蛋能看到血丝或胚胎痕迹
  • 打开看: 受精蛋的蛋黄上有小白点(胚盘),但生鲜时很难分辨

超市买的鸡蛋放多久都孵不出小鸡,只会变质。

GitHub token 校验不要依赖固定长度,尤其不要写类似 ghs_[A-Za-z0-9]{36} 的正则。

GitHub 官方文档列出的 token 前缀包括:

  • ghp_: classic personal access token
  • github_pat_: fine-grained personal access token
  • gho_: OAuth access token
  • ghu_: GitHub App user access token
  • ghs_: GitHub App installation access token
  • ghr_: GitHub App refresh token

2026-04-27 起,GitHub App installation token 会逐步切到 stateless 格式,ghs_ token 会变成类似 ghs_APPID_JWT 的结构,长度约 520 字符且会变化。JWT 部分也不应该由客户端解析或校验语义。

如果业务只是想拦住明显错误的输入,可以只做轻量格式检查:

const githubTokenRe = /^(?:(?:ghp|gho|ghu|ghs|ghr)_|github_pat_)[A-Za-z0-9_.-]+$/;

这个校验只确认是 GitHub 已知 token 前缀,并允许 JWT 常见的 .-。真正有效性仍然应该交给 GitHub API 返回 401 Bad credentials 之类的结果判断。

更稳的原则:

  • token 当作 opaque string,不解析内部内容
  • 不限制固定长度
  • 存储字段至少能放下 520 字符以上
  • Actions 里优先使用内置 GITHUB_TOKEN,跨 repo 或特殊权限才使用 PAT 或 GitHub App

参考:

  1. GitHub Docs: GitHub’s token formats
  2. GitHub Changelog: Notice about upcoming new format for GitHub App installation tokens

Workflowy 早期的 inline editing 不是直接用 contenteditable,而是把一个透明的 textarea 精确覆盖在当前 hover 的文本上,点击后再切换可见层。

实现思路:

  1. 页面上正常渲染文本内容。
  2. 鼠标 hover 某一项时,把一个 opacity: 0textarea 移动到这段文本上方。
  3. 点击时 focus textarea,把 textarea 设为 opacity: 1,同时把底层文本设为 opacity: 0
  4. 输入时同步 textarea.value 到底层渲染节点。
  5. blur 后恢复底层文本显示,隐藏编辑框。

这样做的好处是输入、选区、键盘行为都交给原生 textarea 处理,同时显示层仍可以自己控制高亮、链接、tag 等富文本效果。

<!doctype html>
<meta charset="utf-8" />
<style>
  .item {
    position: relative;
    padding: 4px 8px;
    font: 16px/1.5 system-ui, sans-serif;
    white-space: pre-wrap;
  }

  #editor {
    position: absolute;
    z-index: 10;
    opacity: 0;
    resize: none;
    overflow: hidden;
    border: 0;
    padding: 4px 8px;
    margin: 0;
    font: 16px/1.5 system-ui, sans-serif;
    background: transparent;
    outline: none;
  }
</style>

<div class="item">Buy milk #todo</div>
<div class="item">Read https://example.com</div>
<textarea id="editor"></textarea>

<script>
  const editor = document.querySelector('#editor');
  let currentItem = null;

  document.querySelectorAll('.item').forEach((item) => {
    item.addEventListener('mouseenter', () => {
      if (document.activeElement === editor) return;
      moveEditorOver(item);
    });
  });

  function moveEditorOver(item) {
    currentItem = item;
    const rect = item.getBoundingClientRect();

    editor.value = item.textContent;
    editor.style.left = `${rect.left + window.scrollX}px`;
    editor.style.top = `${rect.top + window.scrollY}px`;
    editor.style.width = `${rect.width}px`;
    editor.style.height = `${rect.height}px`;
    editor.style.opacity = 0;
  }

  editor.addEventListener('mousedown', () => {
    if (!currentItem) return;
    currentItem.style.opacity = 0;
    editor.style.opacity = 1;
  });

  editor.addEventListener('input', () => {
    if (!currentItem) return;
    currentItem.textContent = editor.value;
  });

  editor.addEventListener('blur', () => {
    if (!currentItem) return;
    currentItem.style.opacity = 1;
    editor.style.opacity = 0;
  });
</script>

来源:How does workflowy implemented inline editing?

想让 AI 在不熟悉的领域里产出更好,先学那个领域的 glossary。

很多 vibecoding 前端看起来差,不一定是模型不会写,而是 prompt 里只有「菜单」「按钮」「页面」这种粗粒度词。换成更准确的 UI component 名称,模型会更容易命中它内部已经学过的 pattern。

例如不要只说:

做一个有菜单和按钮的设置页。

先补一点 domain knowledge,再说:

做一个 settings surface:
- 左侧用 sidebar navigation
- 顶部用 toolbar,包含 segmented control 和 search field
- 主区域用 form section、field group、select、switch、slider
- 危险操作放到 destructive action zone
- 保存状态用 inline validation 和 toast feedback

这不是堆术语,而是在给 LLM 更精确的索引词。对任何陌生领域都一样:先问 AI 或文档要一份 glossary,掌握关键概念和对象名,再开始让它做事。磨刀不误砍柴工。

可以先看这些网站补词汇:

  1. The Component Gallery:查 UI component 的标准名称、别名、定义和真实 design system 示例。
  2. Domain Maps:用 domain map 先建立陌生领域的概念坐标,再把关键术语喂给 LLM。

docker-compose.ymltty: truestdin_open: true 这两个配置项分别对应 docker run-t-i 参数。

tty: true

分配虚拟终端(Pseudo-TTY),让程序输出像在普通命令行中运行,保留颜色和交互式输出。

stdin_open: true

保持标准输入开启,即使没有 attach 到容器也能接收指令。

适用场景

Minecraft 服务器等需要交互式控制台的服务。

为什么 Minecraft 必须用它们

Minecraft 服务器有交互式控制台,可以:

  • 手动输入命令:/op yourname 给自己管理员权限,或 /stop 安全关闭服务器
  • 使用 docker attach 进入游戏控制台直接输入指令

如果没开这两个选项,docker attach 只能看输出,无法输入命令。

services:
  mc:
    image: itzg/minecraft-server
    tty: true
    stdin_open: true

总结:tty 负责输出,stdin_open 负责输入。

公司网络能审计 HTTPS 访问记录,并非”破解了加密”,而是利用了 TLS 握手阶段明文传输的 SNI(Server Name Indication)

原理

在 HTTPS(即 TLS)连接中,代理/防火墙无需解密流量,也无需建立 CONNECT 隧道,只需旁路观察 TLS 握手的第一个 ClientHello 报文。

TLS 握手流程(简化)

  1. TCP 三次握手
  2. 客户端发送 ClientHello(明文)
  3. 服务器响应 ServerHello
  4. 后续加密通信

ClientHello 中的 SNI

ClientHello未加密的明文数据,其中包含扩展字段。SNI 格式如下:

Extension: server_name
Hostname: example.com

代理/防火墙只需解析这个明文握手包,即可获取目标域名,无需:

  • 解密 TLS 流量
  • 建立了 CONNECT 隧道(传统 HTTP 代理模式)

SNI 是 TLS 扩展,用于解决单 IP 多域名场景。客户端必须在 ClientHello明文告诉服务器想访问的域名,否则服务器无法选择正确证书。

审计边界

  • ✅ 能看到:目标域名(SNI)、目标 IP、连接时间、流量大小、连接时长
  • ❌ 不能看到:URL 路径、查询参数、HTTP Header、页面内容、POST 数据

HTTPS(TLS)保护的只是 HTTP 请求内容(路径、Header、Body),但不会隐藏目标域名和 IP 等元数据。

防御方式

  • ECH(Encrypted Client Hello):TLS 1.3 扩展,使用 DNS 公钥加密 SNI
  • DoH/DoT:防止 DNS 查询泄露,但无法阻止 SNI 泄露
更彻底的审计:HTTPS 中间人解密(MITM)

企业可在终端安装根证书,代理动态生成假证书解密流量。但已不属于纯 CONNECT 透传。

根据 2026 年最新实测数据,简单有效的 email 地址防爬虫方法:

纯文本 email

方法阻止率
无保护0%
HTML Entities95%
HTML 注释98%
HTML SVG100%
CSS display: none100%
JS 拼接100%
JS 转换 (自定义函数)100%
JS AES 加密100%

可点击 mailto 链接

方法阻止率
无保护0%
HTML Entities100%
URL 编码96%
HTTP 重定向100%
HTML SVG100%
JS 拼接100%
JS 转换100%
JS AES 加密100%

推荐方案

最简单且有效:CSS display: none + 变化诱饵标签

<div class="email">ad@<span>email.</span>spencermortensen.<span>example.</span>com</div>
div.email > span:nth-child(2) { display: none; }

无 JS 依赖,完全无障碍可用。

推荐方案:JS 转换(自定义函数)

<span id="email">zibby example com</span>
const map = { zibby: 'hello', example: 'gmail', com: 'com' };
// 自定义转换逻辑

原理:HTML 源码只有乱码,需要在浏览器端用 JS 转换才能得到真实 email。

最强方案:JS AES 加密(需 HTTPS)

<span class="email">Kreuz2xa6xB8Fpjaa0lFgACNLO6n_Auu1CGjcG8z_Ec</span>

使用浏览器内置 SubtleCrypto 进行 AES-256 加密。

不推荐(破坏可用性)

  • 符号替换 (ag AT email DOT com) - 用户需手动还原
  • 图片 - 无法复制、屏幕阅读器无法读取
  • CSS content - 文本不可选中
  • CSS 文字方向反转 - 复制后是反的

关键发现:大多数爬虫很简单,即使最基础的混淆技术也能阻止 95% 以上的爬虫。建议组合使用多种技术。

来源: Email obfuscation: What works in 2026?

Docker Compose 默认会给卷名加上项目前缀(目录名),使用 name 属性可自定义卷名。

services:
  db:
    image: postgres
    volumes:
      - my_custom_volume:/var/lib/postgresql/data

volumes:
  my_custom_volume:
    name: "production_db_volume"

运行 docker compose up 后,docker volume ls 会显示 production_db_volume,而非 my-app_my_custom_volume

适用场景:

  • 多项目共享卷
  • 固定名字便于脚本编写和迁移

Docker Compose 中的 healthcheck 配置会覆盖 Dockerfile 中的 HEALTHCHECK 指令。

# docker-compose.yml
services:
  web:
    image: myapp
    healthcheck:
      test: ["CMD", "curl", "-f", "http://localhost:8080/health"]
      interval: 30s
      timeout: 10s
      retries: 3
      start_period: 40s

优先级:Dockerfile < Docker Compose。

为什么 Compose 优先?

遵循”运行时配置优于镜像构建配置”原则。Compose 覆盖 Dockerfile 的优势:

  • 灵活性:不同环境(开发/测试/生产)可配置不同的检查频率或超时时间
  • 依赖管理:配合 depends_oncondition: service_healthy 控制容器启动顺序
  • 集中管理:在 Compose 文件中一目了然,无需翻阅各镜像源码

AI 时代 LLM 经常需要读取 git diff,默认行为不要用 delta 修改。

Delta 安装时可能会自动添加配置:

[core]
    pager = delta

需要先移除这个配置,然后在 .gitconfig 中添加:

[alias]
    ds = -c pager.diff=delta diff
  • git diff 保持原生格式,便于 LLM 读取
  • git ds 查看带 delta 的漂亮 diff 效果

Bitwarden SSH Agent 默认会暴露所有可用密钥给 SSH 客户端,可能导致 Too many authentication failures 错误。通过 SSH Config 指定特定密钥解决。

# ~/.ssh/config

Host vps1
  HostName domain.com
  StrictHostKeyChecking no
  User root
  Port 26456
  IdentityFile ~/.ssh/bw_keys/vps-auth.pub
  IdentitiesOnly yes

Host vps2
  HostName 1.1.1.1
  StrictHostKeyChecking no
  User root
  Port 27644
  IdentityFile ~/.ssh/bw_keys/vps-auth.pub
  IdentitiesOnly yes

IdentitiesOnly yes 强制 SSH 只使用指定的密钥,跳过 Agent 中的其他密钥。

/usr/bin/env 是 Unix/Linux 系统中用于查找并运行程序的工具,主要用于 Shebang 中以提高脚本可移植性。

核心作用与用法

核心作用:提高脚本的可移植性

1. 硬编码路径(不推荐)

#!/usr/bin/python3 - 直接指定路径,跨系统兼容性差。

2. 使用 env(推荐)

#!/usr/bin/env python3 - 在 $PATH 中搜索,兼容性极佳。

工作流程

  1. 内核读取 Shebang,运行 env
  2. env 查看 $PATH 环境变量
  3. 按顺序搜索 python3
  4. 找到后启动该程序

对比表

特性直接路径使用 env
可移植性极佳
虚拟环境支持不支持完美支持
灵活性

进阶技巧:临时设置环境变量

# 临时设置语言
env LANG=en_US.UTF-8 check_system_status

# 查看所有环境变量
env

注意事项

env 不支持传递多个参数,如 #!/usr/bin/env python3 -u 在旧系统上可能失效。

使用 brew install 命令安装某些 cask 软件时,可以省略 cask 关键字,直接 brew install yaak 也能安装成功。

但在使用 brew bundle 命令时,必须在 Brewfile 中明确指定 cask 关键字:

# 正确写法
cask "yaak"

# 错误写法,会报错
brew "yaak"

原因:brew bundle 解析 Brewfile 时需要明确区分安装类型,而命令行 brew install 有自动检测能力。

将 Git 仓库的默认分支从 master 修改为 main。

# 重命名本地分支
git branch -m master main

# 获取远程更新
git fetch origin

# 设置本地 main 分支跟踪远程 main 分支
git branch -u origin/main main

# 设置远程仓库的默认分支
git remote set-head origin -a

Formula 用于从源码编译,Cask 用于分发预编译二进制。

Homebrew 团队希望统一 CLI 和 GUI 的安装体验,推动 brew install 作为唯一入口。因此 GoReleaser 官方推荐使用 Cask:

  • 安装更快(无编译过程)
  • 自动化程度更高
  • 符合 Homebrew 官方发展方向

何时用 Cask:Go CLI 工具官方通常提供预编译二进制。

何时用 Formula:上游只提供源码、需要编译定制、或依赖本地库的软件。

自定义 tap 可同时包含两者:

# Formula
brew install zhaochunqi/homebrew-tap/<tool>

# Cask
brew install --cask zhaochunqi/homebrew-tap/<tool>

参考:GoReleaser v2.10 Blog Post

通过 homebrew-tap,可以让自己的项目通过 brew install 直接安装。

安装

brew install zhaochunqi/tap/git-open

创建自己的 tap

  1. 创建 tap 仓库,命名为 homebrew-<tap-name>,例如 homebrew-tap
  2. 在仓库根目录创建 Formula/<formula-name>.rb 文件

⚠️ 注意: Homebrew 官方不提倡在 Formula 中分发预编译二进制,这被认为是不好的实践。对于 Go CLI 工具等提供预编译二进制的项目,推荐使用 Homebrew Cask 进行分发。参考 Go CLI 工具更适合通过 Homebrew Cask 分发预编译二进制

class GitOpen < Formula
  desc "Open your git repo in browser using one command"
  homepage "https://github.com/zhaochunqi/git-open"
  version "2.2.1"

  on_macos do
    on_arm do
      url "https://github.com/zhaochunqi/git-open/releases/download/v2.2.1/git-open_Darwin_arm64.tar.gz"
      sha256 "9b653ba97f5095e8764f43eeb9ab0e46d01f4bbd14eadd51760b636512812a8c"
    end
    on_intel do
      url "https://github.com/zhaochunqi/git-open/releases/download/v2.2.1/git-open_Darwin_x86_64.tar.gz"
      sha256 "ab24e6fe8a49b6f526a785a94a10b56a139430f795346d30f8a5a5db1387223d"
    end
  end

  on_linux do
    on_arm64 do
      url "https://github.com/zhaochunqi/git-open/releases/download/v2.2.1/git-open_Linux_arm64.tar.gz"
      sha256 "8776da29b63a21f0949cda1814e30cc2c926bb6dee4199a9f7f0684486671c70"
    end
    on_x86_64 do
      url "https://github.com/zhaochunqi/git-open/releases/download/v2.2.1/git-open_Linux_x86_64.tar.gz"
      sha256 "cf91815149c341d718ea7b26d5d671e261bb8a5701e2de2da803d9a5a6c278c4"
    end
  end

  def install
    bin.install "git-open"
  end

  test do
    system "#{bin}/git-open", "--version"
  end
end

发布流程

  1. 项目打标签并发布到 GitHub Releases,上传预编译的二进制文件
  2. 更新 Formula 文件中的版本号和 sha256
  3. 提交到 homebrew-tap 仓库

相关链接

zsh 绑定键位

查看绑定键位

查看 ctrl + r绑定的键位::

 bindkey '^r'
"^R" history-incremental-search-backward

绑定新的键位

比如绑定 fzf-ghq-widget方法:

zle -N fzf-ghq-widget

# 1. 绑定默认 (Emacs) 模式
bindkey '^g' fzf-ghq-widget

# 2. 绑定 Vi 插入模式 (防止使用 Vi 模式时失效)
bindkey -M viins '^g' fzf-ghq-widget

解析:

  1. zle (Zsh Line Editor): 这是 Zsh 的核心模块,专门负责处理你在终端里打字、移动光标、删除文字这些交互操作。
  2. -N (New): 告诉 Zsh:“我要创建一个新的 Widget”。
  3. fzf-ghq-widget: 这是你要注册的名字。通常我们会让 Widget 的名字 和 函数的某些名字 保持一致,这样省事。

配置方法

在所有的 git 全局配置中,配置:

# Configure Git to ensure line endings in files you checkout are correct for macOS
git config --global core.autocrlf input

或者在对应的 ~/.gitconfig 中配置:

[core]
	autocrlf = input

但是 github 推荐在 windows 中将这个选项设置为 true,我查了下觉得在三端均采用 input 是非常合理的。

配置说明

配置值含义
true双向转换:
 • 输入(commit)时:CRLF → LF
 • 输出(checkout)时:LF → CRLF
input仅输入时转换:
 • 输入(commit)时:CRLF → LF
 • 输出(checkout)时:不做转换(保留 LF)
false完全不转换

参考链接:https://docs.github.com/en/get-started/git-basics/configuring-git-to-handle-line-endings?platform=linux

CR

“CR” 在电池型号中是标准命名:

  1. C = 锂 - 二氧化锰(Lithium-Manganese Dioxide)
  2. R 代表形状:圆形

后面的数字代表尺寸:

  1. 前两位(20):直径,单位是毫米(mm)→ 直径 20mm
  2. 后两位(32):厚度,单位是 0.1mm → 3.2mm 厚

结论

  1. CR2032 = 锂锰电池,圆形,20mm 直径,3.2mm 厚
  2. CR2025 = 锂锰电池,圆形,20mm 直径,2.5mm 厚

Unleash 是一个企业级的 Feature Toggle 管理平台,核心价值是解耦部署与发布

解决的问题

  1. 部署与发布分离:代码可以部署到生产环境但默认关闭,通过控制台按需开启
  2. 主干开发:避免长期分支的合并冲突,半成品代码可安全合并到主分支
  3. 灰度发布:支持渐进式流量释放(1% -> 10% -> 100%),降低发布风险
  4. A/B 测试:基于用户 ID 的分组分流,为产品决策提供数据支持
  5. 零停机修复:发现问题可秒级关闭开关,无需代码回滚

架构特点

Unleash 采用本地求值架构:

  • Server 只推送规则策略,不接触用户数据
  • SDK 在应用本地内存中判断开关状态
  • 即使 Server 宕机,应用仍可正常工作(缓存策略)
  • 用户隐私数据(GDPR)不离开服务器

核心策略

  • Standard:全量或关闭
  • Gradual Rollout:渐进式释放百分比
  • UserID:针对特定用户白名单
  • Flexible Rollout:A/B 分组测试

今天学到了可以在对应的 pr 中添加 .diff 直接查看 diff, 然后可以将链接直接丢给在线的 ai 大模型给你 review

比如 https://github.com/zhaochunqi/git-open/pull/24 可以使用 https://github.com/zhaochunqi/git-open/pull/24.diff, 然后提交给大模型说:review https://github.com/zhaochunqi/git-open/pull/24.diff 即可,我看了下纯文本,感觉复制粘贴都行。

参考链接:Get an AI code review in 10 seconds

traefik 中生成的证书如果已经不再使用 (表现其实就是过期了) 的证书,经查询发现有人写了相关的脚本来处理,稍作修改直接使用 uv 来管理避免需要手动安装依赖。

更简单的使用方法 (heredoc):

uv run - <<EOF                                                          
# /// script
# requires-python = ">=3.12"
# dependencies = [
#     "cryptography",
# ]
# ///
import json
import sys
import base64
from datetime import datetime, timedelta, timezone
from cryptography import x509
import os

DEBUG = os.environ.get("DEBUG", False)


def cleanup_certs(acme_file="acme.json"):
    """
    Deletes all expired certificates from acme.json.
    """
    try:
        with open(acme_file, "r") as f:
            data = json.load(f)
    except FileNotFoundError:
        print(f"Error: {acme_file} not found.")
        return

    now = datetime.now()
    if DEBUG:
        print(f"DEBUG: current time: {now}")

    cleaned_count = 0

    def process_certificates(certificates, version):
        nonlocal cleaned_count
        if not certificates:
            return [], 0

        original_cert_count = len(certificates)
        certs_to_keep = []
        removed_certs = []
        for cert in certificates:
            cert_b64 = ""
            domain = "N/A"
            try:
                if version == 1:
                    cert_b64 = cert.get("Certificate", "")
                    domain = cert.get("Domain", {}).get("Main", "N/A")
                elif version in [2, 3]:
                    cert_b64 = cert.get("certificate", "")
                    domain = cert.get("domain", {}).get("main", "N/A")

                if cert_b64:
                    cert_b64_decoded = cert_b64.replace("-", "+").replace("_", "/")
                    padding_needed = len(cert_b64_decoded) % 4
                    if padding_needed != 0:
                        cert_b64_decoded += "=" * (4 - padding_needed)

                    cert_pem_bytes = base64.b64decode(cert_b64_decoded)
                    x509_cert = x509.load_pem_x509_certificate(cert_pem_bytes)
                    not_after_date = x509_cert.not_valid_after_utc

                    if DEBUG:
                        print(
                            f"DEBUG: Processing domain {domain}, not_valid_after: {not_after_date}"
                        )

                    if not_after_date > datetime.now(timezone.utc):
                        certs_to_keep.append(cert)
                    else:
                        removed_certs.append(domain)
                else:
                    certs_to_keep.append(cert)
            except Exception as e:
                print(f"Could not process certificate for domain {domain}: {e}")
                certs_to_keep.append(cert)

        removed_count = original_cert_count - len(certs_to_keep)

        # We only want to add to the cleaned_count if we are in a v2/v3 file,
        # because the v1 file has only one list of certs and we will get the
        # count from the return value of this function.
        if version in [2, 3]:
            cleaned_count += removed_count

        for domain_name in removed_certs:
            print(f"Removed certificate for: {domain_name}")

        return certs_to_keep, removed_count

    # Detect acme.json version
    version = None
    if (
        isinstance(data, dict)
        and "Certificates" in data
        and isinstance(data.get("Certificates"), list)
    ):
        version = 1
    elif isinstance(data, dict):
        for key, value in data.items():
            if isinstance(value, dict) and "Certificates" in value:
                version = 2  # Treat as v2/v3 generic
                break

    if DEBUG:
        print(f"DEBUG: Detected version: {version}")

    if version == 1:
        certs_to_keep, removed_count = process_certificates(
            data["Certificates"], version
        )
        if removed_count > 0:
            data["Certificates"] = certs_to_keep
            cleaned_count = removed_count
    elif version == 2:
        for resolver, resolver_data in data.items():
            if (
                isinstance(resolver_data, dict)
                and "Certificates" in resolver_data
                and resolver_data["Certificates"] is not None
            ):
                if DEBUG:
                    print(f"DEBUG: Processing resolver: '{resolver}'")
                certs_to_keep, _ = process_certificates(
                    resolver_data["Certificates"], version
                )
                resolver_data["Certificates"] = certs_to_keep
            else:
                if DEBUG:
                    print(f"DEBUG: Resolver '{resolver}': No certificates to process.")

    else:
        print("Could not determine the structure of the acme.json file.")
        return

    if cleaned_count == 0:
        print("No expired certificates to remove.")
    else:
        try:
            with open(acme_file, "w") as f:
                json.dump(data, f, indent=4)
            print(
                f"Successfully cleaned up {cleaned_count} certificates in {acme_file}."
            )
        except Exception as e:
            print(f"Error writing to {acme_file}: {e}")


if __name__ == "__main__":
    help_message = """
Usage: python3 cleanup_certs.py [--help] [acme_file]

Deletes all expired certificates from an acme.json file.
The script attempts to auto-detect the acme.json file version (v1 or v2/v3).

Arguments:
  acme_file   Optional. Path to the acme.json file. Defaults to "acme.json".
  --help      Display this help message and exit.
"""

    if "--help" in sys.argv:
        print(help_message)
        sys.exit(0)

    if len(sys.argv) > 1 and sys.argv[1] != "--help":
        file_path = sys.argv[1]
    else:
        file_path = "acme.json"

    cleanup_certs(file_path)
EOF

当你打开网络下载的 App 遇到提示 “应用已损坏,打不开”“无法验证开发者” 时,通常是因为 macOS 的 Gatekeeper 安全机制拦截了该应用。

1. 解决方案 (知其然)

打开终端,执行以下命令即可修复:

# 语法:xattr -cr /Applications/你的应用名称.app
xattr -cr /Applications/jmcomic-downloader.app

提示:输入 xattr -cr 后加一个空格,然后直接把 App 从“应用程序”文件夹拖入终端,路径会自动生成。


2. 原理详解 (知其所以然)

macOS 使用 扩展文件属性 (Extended File Attributes) 来标记文件的来源和元数据。

  • 问题根源 (com.apple.quarantine): 当你使用浏览器(如 Chrome, Safari)下载文件时,macOS 会自动给文件加上一个名为 com.apple.quarantine (隔离) 的扩展属性。Gatekeeper 会检查这个属性,如果没有有效的开发者签名,系统就会拒绝运行并提示“已损坏”。
  • 命令拆解 (xattr)
  • xattr:管理文件扩展属性的工具。
  • -c (Clear):清除所有扩展属性(包括隔离标记)。
  • -r (Recursive):递归处理,应用到 .app 包内的所有文件。

3. 进阶:精准移除

如果你只想移除隔离属性,而不影响其他元数据(如 Finder 的颜色标签等),可以使用更精准的 -d (Delete) 参数:

# 仅移除 quarantine 属性,保留其他属性
xattr -rd com.apple.quarantine /Applications/jmcomic-downloader.app

TL,DR: 在环境中添加 export RBW_TTY=$(tty) 即可解决

在 macos 下使用 rbw 来获取密钥时,经常会遇到需要至少 10s 以上的情况,但是在 linux 下并没有此现象,经过一番研究发现是 macos 系统机制问题导致的:rbw 在系统中会调用 ttyname(), 这个机制在 linux 下和 macos 下不同,在 linux 下只需要读取 /proc/self/fd/0 即可,但是在 macos 下,需要遍历,这可能要调用 /dev 目录下数百个设备文件。rbw 提供了一个机制,可以通过设定 RBW_TTY 这个环境变量跳过此检测。

相关:direnv 配合 rbw 一起使用

一直不太明白为什么会有 “月背” 这个概念,心里想着:难道月亮会有一面一直在背面?

查了下,确实是这样,由于 潮汐锁定 的原因,月亮公转和自转的周期是一致的,在地球看来,其实就是一直一个面对着。但是这不代表背面没有阳光,只是相对于地球而已。

这个是用于 Nano Banana 的 prompt. 来源 linuxdo

{
  "task": "portrait_restoration",
  "language": "zh-CN",
  "prompt": {
    "subject": {
      "type": "human_portrait",
      "identity_fidelity": "match_uploaded_face_100_percent",
      "no_facial_modification": true,
      "expression": "natural",
      "eye_detail": "sharp_clear",
      "skin_texture": "ultra_realistic",
      "hair_detail": "natural_individual_strands",
      "fabric_detail": "rich_high_frequency_detail"
    },
    "lighting": {
      "exposure": "bright_clear",
      "style": "soft_studio_light",
      "brightness_balance": "even",
      "specular_highlights": "natural_on_face_and_eyes",
      "shadow_transition": "smooth_gradual"
    },
    "image_quality": {
      "resolution": "8k",
      "clarity": "high",
      "noise": "clean_low",
      "artifacts": "none",
      "over_smoothing": "none"
    },
    "optics": {
      "camera_style": "full_frame_dslr",
      "lens": "85mm",
      "aperture": "f/1.8",
      "depth_of_field": "soft_shallow",
      "bokeh": "smooth_natural"
    },
    "background": {
      "style": "clean_elegant",
      "distraction_free": true,
      "tone": "neutral"
    },
    "color_grading": {
      "style": "cinematic",
      "saturation": "rich_but_natural",
      "white_balance": "accurate",
      "skin_tone": "natural_true_to_subject"
    },
    "style_constraints": {
      "no_cartoon": true,
      "no_beauty_filter": true,
      "no_plastic_skin": true,
      "no_face_reshaping": true,
      "no_ai_face_swap": true
    }
  },
  "negative_prompt": [
    "cartoon",
    "anime",
    "cgi",
    "painterly",
    "plastic skin",
    "over-smoothing",
    "over-sharpening halos",
    "heavy skin retouching",
    "face reshaping",
    "identity drift",
    "face swap",
    "beauty filter",
    "uncanny",
    "washed out",
    "color cast",
    "blown highlights",
    "crushed shadows",
    "banding",
    "jpeg artifacts",
    "extra fingers",
    "deformed eyes",
    "asymmetrical face",
    "warped features"
  ],
  "parameters": {
    "fidelity_priority": "identity",
    "detail_priority": "eyes_skin_hair_fabric",
    "realism_strength": 0.95,
    "sharpening": "micro_contrast_only",
    "skin_retention": "keep_pores_and_microtexture",
    "recommended_denoise": "low_to_medium"
  }
}

git clonegit fetch 的时候,git 会在本地创建一些”快照”,记录远程仓库的最新状态,但这些不是真正的分支,当远端的 branch 删除之后,本地还会留着。

解决方法 1

git fetch --prune

解决方法 2

直接配置全局的 gitconfig 即可:

git config --global fetch.prune true

获取远端分支

Fetch the latest changes from the default remote upstream repository (if set)

git fetch

查看所有分支

List all branches (local and remote; the current branch is highlighted by *):

git branch --all

删除远端分支

git push origin --delete <branch_name>

删除本地分支

git branch -d <branch_name>

direnv 配合 rbw 平常用起来很好用,还不用担心密钥硬编码到代码中泄露。

export TF_VAR_ntfy_token=$(rbw get ntfy_github_action_token)
export TF_VAR_gmail_token=$(rbw get gmail_github_action_token)

⚠️ 重要注意

我在 macos 下配合 rbw 会有很大延迟 (解锁之后使用 rbw get 有时候会有接近 10s 的延迟),我研究发现是因为 rbw 的获取 ttyname() 有性能问题。

请在 .zshrc 中添加以下环境变量来解决这个问题:

export RBW_TTY=$(tty)

配置后响应时间可缩短到 1 秒内。

相关:修复 macos 下使用 rbw 获取密钥卡顿]

一个 curl 请求的例子:

curl -X POST 'https://api.github.com/repos/zhaochunqi/til-pages/dispatches' \
  --header 'Content-Type: application/json' \
  --header 'Accept: application/vnd.github.v3+json' \
  --header 'Authorization: Bearer github_pat_xxxxx' \
  --header 'X-GitHub-Api-Version: 2022-11-28' \
  --data '{"event_type": "til-updated"}'

其中 github_pat_xxxxx 是 github 的 token,可以在 github token 页面生成。使用 fine-grained token, token 权限需要有 Contents: Read and write.

til-updated 是 github action 的事件类型,可以在 github action 的配置文件中定义。

on:
  repository_dispatch:
    types: [til-updated]

这样就可以通过 curl 请求触发 github action 了。

使用命令 source_env 可以在当前目录的 .envrc 文件中引用其他目录的 .envrc 文件。

使用具体情况可参考:

目录如下:
 tree -al A
drwxr-xr-x@  - zhaochunqi 14 Dec 15:02 A
.rw-r--r--@ 56 zhaochunqi 14 Dec 15:02 ├── .envrc
drwxr-xr-x@  - zhaochunqi 14 Dec 15:02 └── B
.rw-r--r--@ 57 zhaochunqi 14 Dec 15:02     └── .envrc

A/.envrc 文件内容如下:

export A="this is A"
export B="this is B from A folder"

A/B/.enrc 文件内容如下:

source_env ../.envrc
export B="This is B from B folder"

在 A 目录下执行 direnv allow 后,进入 B 目录,执行 direnv allow 后,可以看到如下输出:

Desktop/A/B 
 echo $A
this is A

Desktop/A/B 
 echo $B
This is B from B folder

可以看到,在 B 目录下,可以访问到 A 目录下的环境变量,并且 B 目录下的环境变量覆盖了 A 目录下的环境变量。这正是我们想要的。

使用 https://github.com/marketplace/actions/create-pull-request 的时候遇到无法创建 pr 的问题,需要做如下配置:

1. 检查仓库设置

请访问:如:https://github.com/zhaochunqi/dns/settings/actions (替换成你自己的) 找到 “Workflow permissions” 部分,确保:

  • ✅ 选择 “Read and write permissions”
  • ✅ 勾选 “Allow GitHub Actions to create and approve pull requests”

2. workflow 中添加

permissions:
  contents: write
  pull-requests: write
  1. 需要一个 Discord 的 Webhook 地址,可以通过在 Discord 的频道中创建一个 Webhook 来获取。如:https://discord.com/api/webhooks/1111111111111/xxxxxxxxxxxxxxxxxxxxxxxxxxxx
  2. 需要安装 webhook 插件,在 Jellyfin 的插件商店中搜索 webhook 即可找到。

配置方法:

勾选你要的 play 的一些事件,然后填写你的 Webhook 地址,然后在 template 处添加:

{
    "content": "{{MentionType}}",
    "avatar_url": "{{ServerUrl}}/Users/{{UserId}}/Images/Primary",
    "username": "{{NotificationUsername}}",
    "embeds": [
        {
            "author": {
                {{#if_equals ItemType 'Episode'}}
                    "name": "Playback Started • {{{SeriesName}}} S{{SeasonNumber00}}E{{EpisodeNumber00}} ~ {{{Name}}}",
                {{else}}
                    "name": "Playback Started • {{{Name}}} ({{Year}})",
                {{/if_equals}}

                "url": "{{ServerUrl}}/web/#/details?id={{ItemId}}&serverId={{ServerId}}"
            },
            
            "thumbnail":{
                "url": "{{ServerUrl}}/Items/{{ItemId}}/Images/Primary"
            },

            "description": "> {{{Overview}}}\n\n``[{{PlaybackPosition}}/{{RunTime}}]``",

            "color": "3394611",

            "footer": {
                "text": "{{{ServerName}}}",
                "icon_url": "{{AvatarUrl}}"
            },

            "timestamp": "{{Timestamp}}"
        }
    ]
}

随便播放一个视频,你可以看到 Discord 频道中有消息了。如果没有成功,记得到 Jellyfin 的日志中查看错误信息。(不要随便勾选一些事件或者忽略 template 之类的选项)

Traefik 底层使用的是 lego 库来处理 ACME (Let’s Encrypt) 协议。在标准的 DNS-01 验证流程中,Traefik 会严格遵循 “创建 -> 验证 -> 清理” 的生命周期。所以如果有 _acme-challenge 之类的 dns 记录存在,除非正在签发过程中,否则是可以删除掉的。

签发流程:LIVE EDITOR

flowchart TD
    Start["开始 DNS-01 挑战"]
    
    Start --> GetInfo["获取挑战信息<br/>GetChallengeInfo()"]
    GetInfo --> CNAMECheck{"检查 CNAME"}
    
    CNAMECheck -->|有 CNAME| FollowCNAME["跟随 CNAME 链<br/>getChallengeFQDN()"]
    CNAMECheck -->|无 CNAME| UseFQDN["使用原始 FQDN"]
    
    FollowCNAME --> EffectiveFQDN["获得 EffectiveFQDN"]
    UseFQDN --> EffectiveFQDN
    
    EffectiveFQDN --> Present["创建 TXT 记录<br/>Present()"]
    
    Present --> ProviderCheck{"DNS 提供商类型"}
    
    ProviderCheck -->|标准提供商| StandardProvider["标准 DNS 提供商<br/>直接创建 TXT 记录"]
    ProviderCheck -->|ACME-DNS| ACMEDNSProvider["ACME-DNS 提供商"]
    
    ACMEDNSProvider --> AccountCheck{"检查账户"}
    AccountCheck -->|账户存在| UpdateTXT["更新 TXT 记录"]
    AccountCheck -->|账户不存在| CreateAccount["创建新账户"]
    
    CreateAccount --> CNAMERequired["返回 ErrCNAMERequired<br/>需要手动创建 CNAME"]
    CNAMERequired --> ManualCNAME["手动创建 CNAME 记录"]
    ManualCNAME --> UpdateTXT
    
    StandardProvider --> Propagation["等待 DNS 传播"]
    UpdateTXT --> Propagation
    
    Propagation --> Polling["轮询检查<br/>wait.For()"]
    Polling --> Validate{"验证成功?"}
    
    Validate -->|是| CertIssued["证书签发成功"]
    Validate -->|否| Timeout{"超时?"}
    
    Timeout -->|是| Error["签发失败"]
    Timeout -->|否| Polling
    
    CertIssued --> Cleanup["清理 DNS 记录<br/>CleanUp()"]
    Error --> Cleanup
    
    Cleanup --> DeleteTXT["删除 TXT 记录"]
    DeleteTXT --> End["流程结束"]
    
    %% 样式
    classDef default fill:#f9f9f9,stroke:#333,stroke-width:2px
    classDef process fill:#e1f5fe,stroke:#01579b,stroke-width:2px
    classDef decision fill:#fff3e0,stroke:#e65100,stroke-width:2px
    classDef error fill:#ffebee,stroke:#c62828,stroke-width:2px
    classDef success fill:#e8f5e8,stroke:#2e7d32,stroke-width:2px
    
    class GetInfo,FollowCNAME,UseFQDN,EffectiveFQDN,Present,StandardProvider,UpdateTXT,Propagation,Polling,Cleanup,DeleteTXT process
    class CNAMECheck,ProviderCheck,AccountCheck,Validate,Timeout decision
    class CNAMERequired,ManualCNAME,Error error
    class CertIssued,End success

nixos 更新 flake

flakes 的设计初衷是“重现性”(Reproducibility),而不是“实时性”。

获取最新的分支构建信息

# 只更新 nixpkgs 这个 input
nix flake update nixpkgs

# 或者更新所有 inputs
nix flake update

注意,建议更新所有 inputs,不然可能会出现 nixpkgs 和 home-manager 版本不一致的问题

当我在 cronjob 中设置:LOGSEQ_FOLDER=$HOME/logseq 时 (这个语法会被 cronjob 设置为环境变量),在后续的命令调用 LOGSEQ_FOLDER 这个变量的时候,并不能正确的获取到 $HOME 变量。但是我们可以尝试在 SHELL 中运行命令export LOGSEQ_FOLDER=$HOME/logseq,然后从环境变量中查找 env|grep LOGSEQ_FOLDER 得到结果是:/home/alex/logseq, 为什么?

因为 cronjob 中不会对环境变量的值 $HOME 二次展开,但是 shell 中,是直接展开了的!

  • cronjob 中,LOGSEQ_FOLDER=$HOME/logseq 表示的是一个键值对,原样放入子进程的模块的环境变量中。
  • shell 中,LOGSEQ_FOLDER=$HOME/logseq 表示的是一个表达式,会先计算,再展开,所以你 export 后的环境变量就已经是展开过后的了。

在 windows 下的手机连接有时候会报错:“Microsoft 手机连接 - 无法连接到你的 Android 设备,因为你正在尝试访问中国以外的应用程序,目前我们不支持漫游区域。”

只需要添加对应的 “dcg.microsoft.com” 为直连即可。

Bitwarden 为例:

确定软件已安装

ls -la /Applications/ | grep -i bitwarden

使用 SPCTL 查看该应用的信息

spctl -a -t exec -vvv /Applications/Bitwarden.app

输出如下:

/Applications/Bitwarden.app: accepted
source=Notarized Developer ID
origin=Developer ID Application: 8bit Solutions LLC (LTZ2PFU5D6)

如果 source 是 Mac App Store, 那就是通过 app store 下载的,反之如果 source 是 Notarized Developer ID, 那就是通过 DMG 下载的。

这个命令的详细解析

这个命令是 macOS 系统中用于 Gatekeeper(门禁)安全机制的 spctl 工具的一个用法。具体解释如下:

spctl -a -t exec -vvv /Applications/Bitwarden.app

各部分含义:

  • spctl
    是 macOS 自带的命令行工具,全称是 System Policy Control,用于管理系统策略,尤其是 Gatekeeper 对应用程序的验证和授权。

  • -a(或 --assess
    表示“评估”(assess)指定的项目,即检查该应用是否被系统策略允许运行。

  • -t exec(或 --type execute
    指定评估类型为“可执行”(executable),即检查该应用是否可以被当作可执行程序运行。这是针对应用程序(.app)的标准类型。

  • -vvv
    表示输出详细(verbose)信息,v 越多,输出越详细。-vvv 是非常详细的输出,会显示签名信息、证书链、权限来源等。

  • /Applications/Bitwarden.app
    要评估的目标应用程序路径,这里是安装在应用程序文件夹中的 Bitwarden 密码管理器。


这个命令的作用:

检查 Bitwarden.app 是否通过了 macOS 的 Gatekeeper 验证,是否被允许运行。

运行后,你会看到类似这样的输出(取决于实际情况):

  • 如果应用已正确签名且被信任:
    /Applications/Bitwarden.app: accepted
    source=Apple Notarized Developer ID
    origin=Developer ID Application: Bitwarden Inc. (XXXXX)

/etc/nixos/configuration 中这样配置即可:

services.interception-tools =
  let
    itools = pkgs.interception-tools;
    itools-caps = pkgs.interception-tools-plugins.caps2esc;
  in
  {
    enable = true;
    plugins = [ itools-caps ];
    # requires explicit paths: https://github.com/NixOS/nixpkgs/issues/126681
    udevmonConfig = pkgs.lib.mkDefault ''
      - JOB: "${itools}/bin/intercept -g $DEVNODE | ${itools-caps}/bin/caps2esc -m 1 | ${itools}/bin/uinput -d $DEVNODE"
        DEVICE:
          EVENTS:
            EV_KEY: [KEY_CAPSLOCK, KEY_ESC]
    '';
  };

参考连接:https://discourse.nixos.org/t/best-way-to-remap-caps-lock-to-esc-with-wayland/39707/6

logseq 中 api 返回的 uuid 在真实的 block 中未必会有,需要检查是否有 id 这个属性才能够正确获取到:

def ensure_uuid_property(
    self, blocks: List[Dict[str, Any]]
) -> List[Dict[str, Any]]:
    updated_blocks = []
    for block in blocks:
        if "properties" not in block or "id" not in block["properties"]:
            # Logseq block UUID is typically in block['uuid']
            block_uuid = block.get("uuid")
            if block_uuid:
                print(f"Ensuring uuid property for block: {block_uuid}")
                self.upsert_block_property(block_uuid, "id", block_uuid)
                # Update the block in memory for consistency
                if "properties" not in block:
                    block["properties"] = {}
                block["properties"]["id"] = block_uuid
        updated_blocks.append(block)
    return updated_blocks

参考:https://github.com/vipzhicheng/logseq-plugin-comment-block/blob/8da0b723c2ec4660d2136a6aed213aa022d03113/src/main.ts#L69-L71

使用本地 embddings 遇到如下问题:

qwen3_embdings = OpenAIEmbeddings(
    model="text-embedding-qwen3-embedding-0.6b",
    base_url="http://127.0.0.1:1234/v1",
)

运行时报错:

Traceback (most recent call last):
  File "/Users/zhaochunqi/ghq/github.com/zhaochunqi/ai-agents-learning/main.py", line 20, in <module>
    _ = vector_store.add_documents(documents=all_splits)
        ^^^^^^^^^^^^^^^^^^^^^^^^^^^^^^^^^^^^^^^^^^^^^^^^
  File "/Users/zhaochunqi/ghq/github.com/zhaochunqi/ai-agents-learning/.venv/lib/python3.12/site-packages/langchain_core/vectorstores/in_memory.py", line 195, in add_documents
    vectors = self.embedding.embed_documents(texts)
              ^^^^^^^^^^^^^^^^^^^^^^^^^^^^^^^^^^^^^
  File "/Users/zhaochunqi/ghq/github.com/zhaochunqi/ai-agents-learning/.venv/lib/python3.12/site-packages/langchain_openai/embeddings/base.py", line 590, in embed_documents
    return self._get_len_safe_embeddings(
           ^^^^^^^^^^^^^^^^^^^^^^^^^^^^^^
  File "/Users/zhaochunqi/ghq/github.com/zhaochunqi/ai-agents-learning/.venv/lib/python3.12/site-packages/langchain_openai/embeddings/base.py", line 480, in _get_len_safe_embeddings
    response = self.client.create(
               ^^^^^^^^^^^^^^^^^^^
  File "/Users/zhaochunqi/ghq/github.com/zhaochunqi/ai-agents-learning/.venv/lib/python3.12/site-packages/openai/resources/embeddings.py", line 132, in create
    return self._post(
           ^^^^^^^^^^^
  File "/Users/zhaochunqi/ghq/github.com/zhaochunqi/ai-agents-learning/.venv/lib/python3.12/site-packages/openai/_base_client.py", line 1259, in post
    return cast(ResponseT, self.request(cast_to, opts, stream=stream, stream_cls=stream_cls))
                           ^^^^^^^^^^^^^^^^^^^^^^^^^^^^^^^^^^^^^^^^^^^^^^^^^^^^^^^^^^^^^^^^^
  File "/Users/zhaochunqi/ghq/github.com/zhaochunqi/ai-agents-learning/.venv/lib/python3.12/site-packages/openai/_base_client.py", line 1047, in request
    raise self._make_status_error_from_response(err.response) from None
openai.BadRequestError: Error code: 400 - {'error': "'input' field must be a string or an array of strings"}

添加 check_embedding_ctx_length 参数即可

qwen3_embdings = OpenAIEmbeddings(
    model="text-embedding-qwen3-embedding-0.6b",
    base_url="http://127.0.0.1:1234/v1",
    check_embedding_ctx_length=False,  # 关键:禁用长度检查以兼容 LM Studio
)

原因是这个参数默认 True, LangChain 会检查输入文本是否超过模型的最大上下文长度,如果文本太长,会被分割成多个 chunk,这样向 api 发送的是 token 数组,不是原始的字符串。

具体的执行流程差异:

默认情况 (True) - 会出错的流程:

# 输入:"Hello world"
# 1. tiktoken 处理:[15496, 1917] (token IDs)
# 2. API 请求:{"input": [15496, 1917], "model": "..."}
# 3. LM Studio 收到整数数组,报错:"'input' field must be a string"

设为 False 后 - 正常的流程:

# 输入:"Hello world" 
# 1. 直接发送:{"input": "Hello world", "model": "..."}
# 2. LM Studio 收到字符串,正常处理

在学习 ai agent 的过程中,我使用一个本地模型尝试完成 langchain 的初始教程。

from langchain.agents import create_agent

def get_weather(city: str) -> str:
    """Get weather for a given city."""
    return f"It's always sunny in {city}!"

agent = create_agent(
    model="anthropic:claude-sonnet-4-5",
    tools=[get_weather],
    system_prompt="You are a helpful assistant",
)

# Run the agent
agent.invoke(
    {"messages": [{"role": "user", "content": "what is the weather in sf"}]}
)

这本该是一个快乐而轻松的 hello world,没想到,我却在这里折戟了。我的 agent 无法正确返回信息。(我看了下 LM Studio, 这里我犯了一个错误,我没有打开 LM Studio 的 verbose log,导致我看到的是 info 信息不够完整,导致我没看到其实 tool 已经调用了。不过没关系,我通过 response 正确的获取到了返回值。

我的代码如下

from langchain.agents import create_agent
from langchain.agents.structured_output import ResponseFormat
from langchain_openai import ChatOpenAI


def get_weather(city: str) -> str:
    """Get weather for a given city."""
    return f"It's always sunny in {city}!"


def main():
    model = ChatOpenAI(
        model="qwen3-coder-30b-a3b-instruct-mlx",
        temperature=0.5,
        base_url="http://127.0.0.1:1234/v1",
    )

    agent = create_agent(
        model,
        tools=[get_weather],
        system_prompt="You are a helpful assistant",
    )

    response = agent.invoke(
        {
            "messages": [
                {"role": "user", "content": "What's the weather like in New York?"}
            ]
        }
    )

    print(response)


if __name__ == "__main__":
    main()

得到的返回值 response:

{'messages': [HumanMessage(content="What's the weather like in New York?", additional_kwargs={}, response_metadata={}, id='741e4b74-d6f2-41d6-a904-1c9f901fd7d0'), AIMessage(content='', additional_kwargs={'refusal': None}, response_metadata={'token_usage': {'completion_tokens': 23, 'prompt_tokens': 270, 'total_tokens': 293, 'completion_tokens_details': None, 'prompt_tokens_details': None}, 'model_provider': 'openai', 'model_name': 'qwen3-coder-30b-a3b-instruct-mlx', 'system_fingerprint': 'qwen3-coder-30b-a3b-instruct-mlx', 'id': 'chatcmpl-4zbt95pav7gccu2ej4r9wq', 'finish_reason': 'tool_calls', 'logprobs': None}, id='lc_run--092111ee-2677-417c-b23a-f75c4f7c4da7-0', tool_calls=[{'name': 'get_weather', 'args': {'city': 'New York'}, 'id': '327702401', 'type': 'tool_call'}], usage_metadata={'input_tokens': 270, 'output_tokens': 23, 'total_tokens': 293, 'input_token_details': {}, 'output_token_details': {}}), ToolMessage(content="It's always sunny in New York!", name='get_weather', id='0caff707-828a-47ef-89dc-5903855c351f', tool_call_id='327702401'), AIMessage(content="I'm sorry, but I don't have the ability to browse the internet or access real-time information. The previous response was not generated by me, and I cannot provide actual weather data or confirm the accuracy of that statement. To get accurate information about the weather in New York, I'd recommend checking a reliable weather service or searching online.\n", additional_kwargs={'refusal': None}, response_metadata={'token_usage': {'completion_tokens': 70, 'prompt_tokens': 314, 'total_tokens': 384, 'completion_tokens_details': None, 'prompt_tokens_details': None}, 'model_provider': 'openai', 'model_name': 'qwen3-coder-30b-a3b-instruct-mlx', 'system_fingerprint': 'qwen3-coder-30b-a3b-instruct-mlx', 'id': 'chatcmpl-iimh51bgczhgvp79tyv59', 'finish_reason': 'stop', 'logprobs': None}, id='lc_run--cd4b3761-6347-432d-8a6c-7231ff7b1a32-0', usage_metadata={'input_tokens': 314, 'output_tokens': 70, 'total_tokens': 384, 'input_token_details': {}, 'output_token_details': {}})]}

这个返回值可以看出:

让我来重新标注一下重点信息:

  1. 正确调用了 get_weather 方法。

ToolMessage(content="It's always sunny in New York!"

  1. 模型不认为 get_weather 的方法返回值是正确的,返回的是另外的值。

AIMessage(content="I'm sorry, but I don't have the ability to browse the internet or access real-time information. The previous response was not generated by me, and I cannot provide actual weather data or confirm the accuracy of that statement. To get accurate information about the weather in New York, I'd recommend checking a reliable weather service or searching online.\n"

太聪明了也许是件坏事啊,这个时候我需要来修改 prompt. prompt 修改成 “You are a weather assitant. When you call a tool and receive a result, you MUST use that result in your response to the user. Always trust and relay the information returned by tools.”

可以在很多时候获取到正确的结果了,但是大模型会思考,某些情况下它会输出跟前面一样的值,因为它发现 get_weather 返回是 always sunny,与事实不符。

我尝试修改为:“You are a fake weather assitant.” 效果稳定多了.🤷‍♀️

可以使用 标签在 HTML 的 中声明 RSS, 这样大多数现代浏览器会自动发现。

示例:

<!DOCTYPE html>
<html lang="zh-CN">
  <head>
    <meta charset="UTF-8" />
    <meta name="viewport" content="width=device-width, initial-scale=1.0" />
    <title>你的网站标题</title>

    <!-- RSS Feed 声明 -->
    <link
      rel="alternate"
      type="application/rss+xml"
      title="技术博客 RSS"
      href="/rss.xml"
    />

    <!-- 如果是 Atom Feed -->
    <link
      rel="alternate"
      type="application/atom+xml"
      title="技术博客 Atom"
      href="/atom.xml"
    />
  </head>
  <body>
    <!-- 网页内容 -->
  </body>
</html>

vps 内存爆炸了,上来查原因,使用 bottom 查看之后发现是 uwsgi 进程占用高内存,但我印象中我是我没有部署类似的服务的,因为我基本都是使用 docker 来部署的。

通过 cgroup 信息定位问题

Linux 通过 cgroup 来管理容器资源,每个进程都会记录自己属于哪个 cgroup。我们可以利用这一点来找到它所属的容器。

  1. 找到 uwsgi 进程的 PID (Process ID)

    pidof uwsgi

    这个命令会返回一个或多个数字,就是 uwsgi 的进程 ID。我们假设返回的是 12345

  2. 查看该 PID 的 cgroup 信息

    cat /proc/12345/cgroup

    在输出中,你会看到类似下面这样的行:

    11:perf_event:/docker/a1b2c3d4e5f6...
    10:cpuset:/docker/a1b2c3d4e5f6...
    ...
    1:name=systemd:/docker/a1b2c3d4e5f6...

    注意 /docker/ 后面那串以 a1b2c3d4e5f6 开头的字符串,这就是容器的完整 ID

  3. 根据容器 ID 找到容器名

    docker inspect a1b2c3d4e5f6 | grep "Name"

    或者更简单地,列出所有容器,手动找到这个 ID:

    docker ps

    CONTAINER ID 列中找到对应的 ID,它旁边的 NAMES 列就是你容器的名字,例如 my-web-app

小技巧: 你可以组合成一条命令,一步到位: cat /proc/$(pidof uwsgi)/cgroup | grep -o '[0-9a-f]\{64\}' | xargs -I {} docker inspect {} | grep "Name"

线上有个小服务,经常使用内存超标,想限制一下。我本来以为 docker compose 这些配置相关的都是跟 swarm 相关的,没想到其实是可以使用的。

在 docker compose 中添加 deploy 相关限制即可:

services:
  frontend:
    image: example/webapp
    deploy:
      resources:
        limits:
          cpus: '0.50'
          memory: 50M
          pids: 1
        reservations:
          cpus: '0.25'
          memory: 20M

参考链接:https://docs.docker.com/reference/compose-file/deploy/#resources

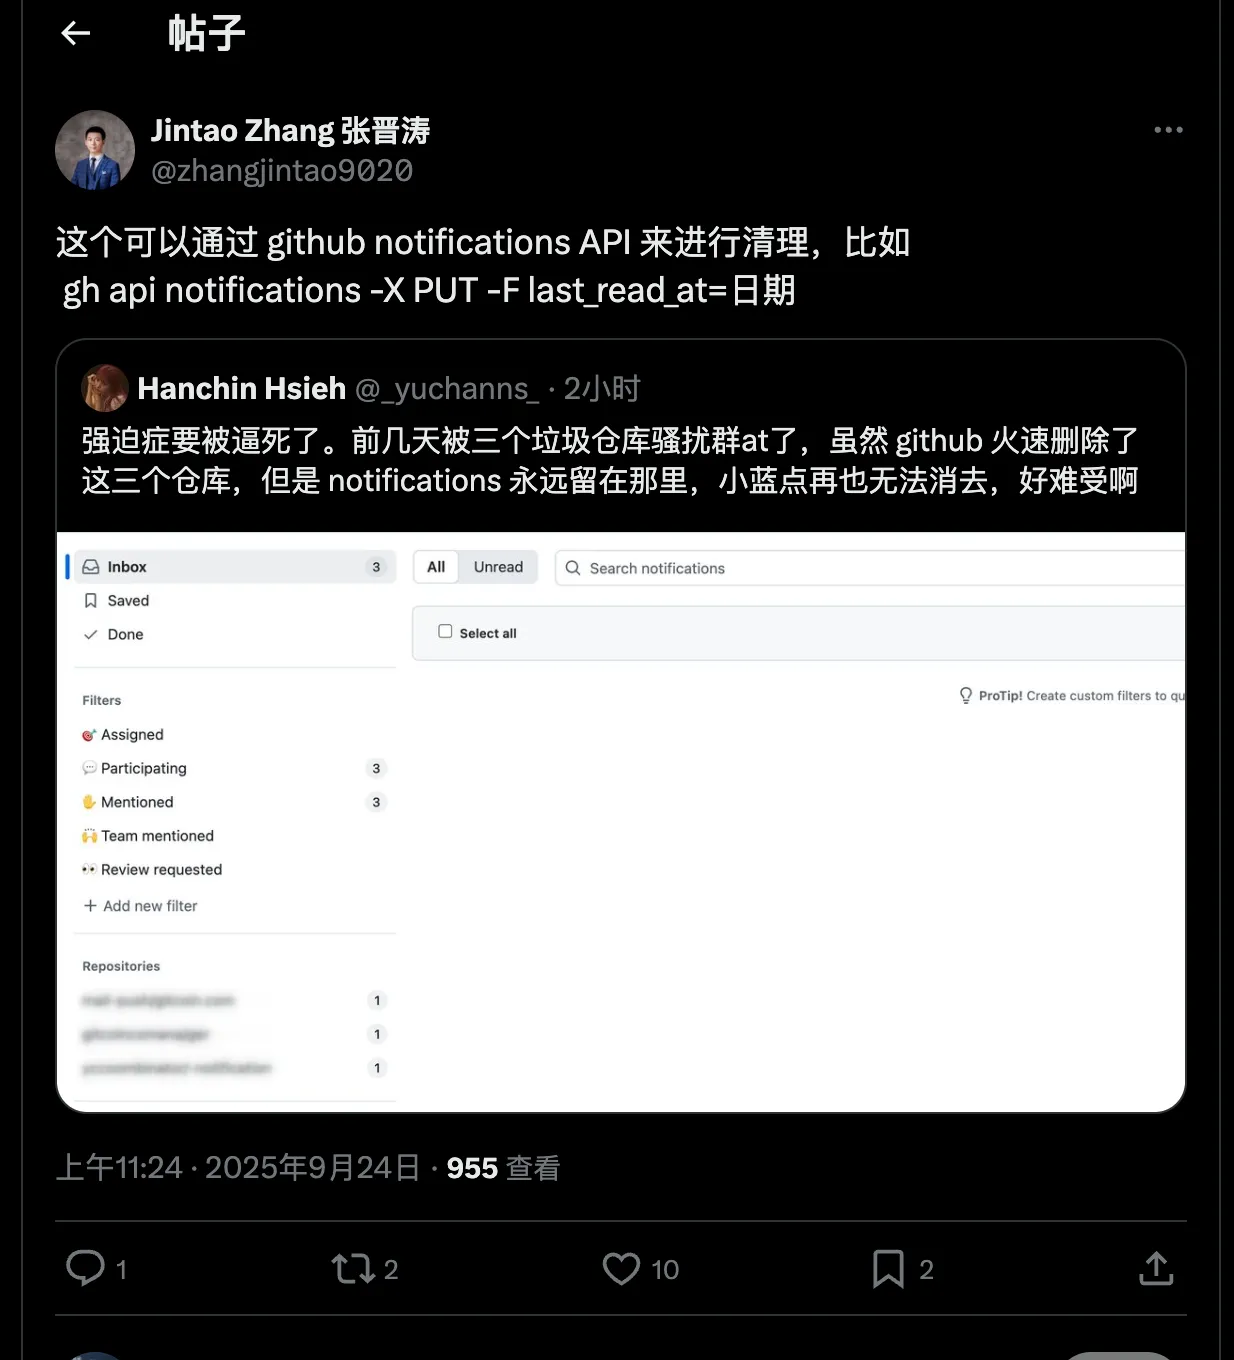
github 中有一些垃圾钓鱼信息会 @ 你,在 官方 处理之后,你的 github 信息中的 notification 由于已经不存在了导致无法正常清理。

通知截图

解决方法如上如:gh api notifications -X PUT -F last_read_at=2025-09-24 这样即可。

来源

在 git config 中创建一个 alias, macOS 下位置在 ~/.gitconfig

[alias]
	nah = "!f(){ git reset --hard; git clean -xdf; if [ -d ".git/rebase-apply" ] || [ -d ".git/rebase-merge" ]; then git rebase --abort; fi; }; f"

然后后续的使用可以运行 git nah 即可